
Processing Chicken: Real Life Farm to Table

**WARNING: GRAPHIC CONTENT. BLOOD AND ANIMAL BUTCHERING.**
If you follow our farm, you know that we have been raising 50+ meat birds with the end goal of providing humanely raised, all natural meat. Last year we made a post documenting the process of processing turkey and this year we decided to show how our chickens go from pasture to plate and teach you a little bit about how we do things. First we will briefly explain how we raise them and then I will show and explain how we process them (complete with detailed pictures and a video!) and end with a cost analysis.
This is a great read if: you want to process a bird, you are new to meat birds, you are experienced with meat birds, you want to be aware of where your food comes from, you eat meat, or if you just want to see how chickens go from farm to table in something that ISN'T a factory farm setting.
Note: this is just how we do things. There are many methods, and after much trial and error we find this is what works the best for us and our farm.

Housing:
We built a meat bird tractor that has held up well the last few years. The PVC pipe frame makes it light and easy to move by hand, but the height makes it easy to walk in for daily chores. It is in a section of pasture surrounded by electric fencing and we have not had causalities due to predators with this set up. We move it every day or every other day. The chickens get to eat fresh bugs and stand in fresh grass if they so desire but are still safe from predators. As they poop a lot, we find this is the best way to mange them and give them a good life.


Feed
It is important to feed Cornish cross 12 hours on and remove feed for 12 hours, or they can eat themselves to death. In previous years we have only fed organic feed. This year we changed to all natural feed because it contains a natural coccidistat which organic feed does not. It is newly illegal (punishable with a $10,000 fine) to have Corrid without a vet prescription, and Corrid is the treatment for cocsidiosis, which can quickly kill any flock. Due to this, we decided prevention was the best choice. We purchase our feed from Poulins, which sources all of their ingredients in Vermont. Local, all natural feed combined with pasture and bugs makes us feel good about the food our birds consume and that we will ultimately put into our bodies. The natural feed is also HALF the cost of organic feed, which is expensive due to all of the certification they need to get. We would love to try fermenting feed in the future.
Breed
We chose to raise Jumbo Cornish cross from Murray McMurray's for a few reasons. For meat you can raise heritage or hybrid breeds. Both have their benefits and drawbacks. We chose to use hybrids because they grow more than 3x faster than heritage breeds and have a much better income/outcome ratio. A common misconception is that hybrids are "unnatural". They were created using selective breeding to get certain traits- fast growth and high meat yields. Cross breeding to create more prolific animals with certain traits is common practice in all animal breeding. Cornish cross do have their drawbacks; they are genetically predisposed to a plethora of ailments if they are left to get too big (including heart conditions, lung conditions, broken legs, and death), they will eat themselves to death if given the chance, can not naturally reproduce, they have relatively high mortality rates throughout their life. We took the negatives into account when we made our choice.
How We Process Meat Birds
We have tried MANY methods and this is what we find works the best for us and our birds.
Firstly, we recommend buying chickens that will be ready to process in the spring or fall. It is much harder to process birds in hot weather. We process anywhere from 7-8 weeks old but try to not do them all in one day. We do not process any later than 8 weeks old.
Firstly, we recommend buying chickens that will be ready to process in the spring or fall. It is much harder to process birds in hot weather. We process anywhere from 7-8 weeks old but try to not do them all in one day. We do not process any later than 8 weeks old.
We hang a few traffic cones and cut the tips off from them. We could hang actual chicken butchering cones, but we are resourceful and don't want to spend money on something we don't need. We have done the processing with and without the bucket underneath and highly recommend it, it makes things much easier to wash down and keeps the flies down. We find two chickens bleeding out at a time is reasonable for us right now.

Grab a friend! The more people you have helping you out the quicker the process goes. We processed over 40 of the birds in one day with the help of fellow homesteader Tami. Also, I feel like it is important to mention that women CAN process chicken. If you are a lady and have felt held back or not confident, no more! Read this post and happily provide food for your family.

Step 1: Slaughtering
1. Put the bird in the cone. The blood will rush to it's head, making the bird more calm.
2. Pull it's head through until it's neck is clearly showing. We use one hand to cover the birds eyes and pull the head down to make the bird less stressed out- just watch your fingers!

3. Say a quick thank you to the bird (in your head or out loud) for giving it's life to provide sustenance for your family. Obviously this step isn't needed, but on our farm it is an important one.
4. Firmly slice across the neck with a razor knife. This is EXTREMELY sharp and does the job quickly and well. This ruptures a main artery and the chicken will die very quickly. Pull the neck to the side and let it bleed for a few seconds and then completely remove the head. If you don't care about bleeding properly and feel freaked out by the whole thing, it is okay to just cut the head completely off the first cut. I recommend dropping the head right into the bucket and not looking at it if you are sensitive (as I am). There will be some flapping and movement, as that is the natural response to death. Don't panic.


5. Let it hang until it is clearly no longer dripping blood.
2. Pull it's head through until it's neck is clearly showing. We use one hand to cover the birds eyes and pull the head down to make the bird less stressed out- just watch your fingers!

4. Firmly slice across the neck with a razor knife. This is EXTREMELY sharp and does the job quickly and well. This ruptures a main artery and the chicken will die very quickly. Pull the neck to the side and let it bleed for a few seconds and then completely remove the head. If you don't care about bleeding properly and feel freaked out by the whole thing, it is okay to just cut the head completely off the first cut. I recommend dropping the head right into the bucket and not looking at it if you are sensitive (as I am). There will be some flapping and movement, as that is the natural response to death. Don't panic.


Step 2: Skinning V.S. Plucking
Skinning:
If you don't have the money/connections to get a plucker, or you don't care about the skin, a quicker method is to skin your bird.
1.Make a small incision around the leg joint. The leg should quite easily separate. (Pictured in the plucking section). This part when beginning was always the hardest step for me. It will be warm and feel like a normal chicken leg. Just take a deep breath and remember at this point it is dead and now you are just preparing food.
2.Flip the bird onto it's back. Lift the skin and cut upwards and away from you- this way you won't cut yourself or the meat. Cut a long slice just through the skin.
2.Flip the bird onto it's back. Lift the skin and cut upwards and away from you- this way you won't cut yourself or the meat. Cut a long slice just through the skin.

3. Once you have the slit, set down your knife. Slide your hands underneath separating the skin from the body. It will feel like you are undressing it- slide over each leg and the whole bottom half of the body. I find it handy to have a bucket near by for this step. You can use a knife to remove the feathers on the wing.


4. Give the bird a rinse, disinfect the surface, and you are ready for the next step!

Plucking:
1. Heat a large pot to 140 degrees Fahrenheit. Our pot got hot quicker than anticipated so we had to wait for it to cool.


2. Hold the bird by it's feet and swish in the water for 30- 40 seconds. This is called scalding.

3. We built a small frame around the base of the plucker to keep it in place. Turn on the plucker and run the bird over it until almost all of the feathers are removed. Set on a table and quickly remove any straggling feathers and give the bird a good rinse.


4. Slice the leg joint where shown and it should pop apart. Set the feet aside and you are ready for the next step. The feet make great chicken broth or great treats for your dog.


Step 3: Eviscerating
Here is a quick video demonstrating how we quickly eviscerate a chicken on the farm. Fellow Homesteader Tami from Rock N Root farm is the one pictured in the video.
1. Take your fingers and put them into the hole where the neck is. Slide them around until you have loosened all of the connective tissue around the crop. If you withhold food before hand, the crop with be a small blob. If you do not, it will be a firm large shape about the size of a softball. Be careful not to cut the crop.


Method 1: Large Hands & Beginners
I cut a long slit down the bottom, branching out to both sides of the cloaca. It looks like an upside down "Y". The second cut I do is a "V", using the bones as a guide and cutting off the tail. Be sure to always cut away from the organs, pull back the skin with your fingers to avoid touching them as well. This gives you an ample view of the organs and plenty of space to work if you have larger hands.


Method 2: Small hands & Experienced
Use your knife to carefully remove the scent gland from on top of the tail. Leave the rest of the tail in tact. Make a slice under the cloaca, careful not to nick any intestines. Carefully cut around it until it is no longer attached to the body.


3. Hold the bird by one wing and let gravity do most of the work. Reach your hands inside and loosen everything up. Make sure there is no connective tissue left. This will make it much easier to remove the organs. Pull them all out, by hand, careful not to break anything. The whole thing should come out, including all the way up to the crop. We set aside the heart and the liver. Attached to the liver is a green blob- this is normal and called a gallbladder. DO NOT BREAK IT OPEN. It will spoil the meat. For this reason we wait to remove it from the liver until the liver is no where near the rest of the meat. It is much better to lose the liver than a whole bird.


4. Use the lung scraper to remove the lungs. You do not NEED a lung scraper, but it will definitely make your life easier.

This is how the bird will look using method one and method two. As you can see method two is a much smaller hole which is better for stuffing.


5. Rise out the cavity well and give the whole bird another rinse down. We leave the neck on the bird because it makes such good chicken stock, but if you want to remove it you can do it now. Bag it and put it in a cooler full of ice immediately. It is now ready to head inside for the next steps! Make sure to rise down and disinfect your surface and all of your tools regularly throughout the process. Also, prepare to have to hop in the shower yourself. Things can get quite messy.


Step 4: Packaging
Until you are ready to head inside to package the meat, place all of the finished birds in a large cooler full of ice. Let the meat rest for 24 hours before packaging. You may do a brine at this point if you desire.
Weigh the meat. This is the only way to know how much you spent per pound and is something that is important to keep track of, even if it is for your own consumption. The easiest way to do this is to weigh yourself on a regular bathroom scale and then weigh yourself and the bird. Subtract your weight from the total weight and write down the weight of the bird.

Thoroughly wash the meat in cold water- inside and out. At this point take off any yellow or extra feathers you may have missed.

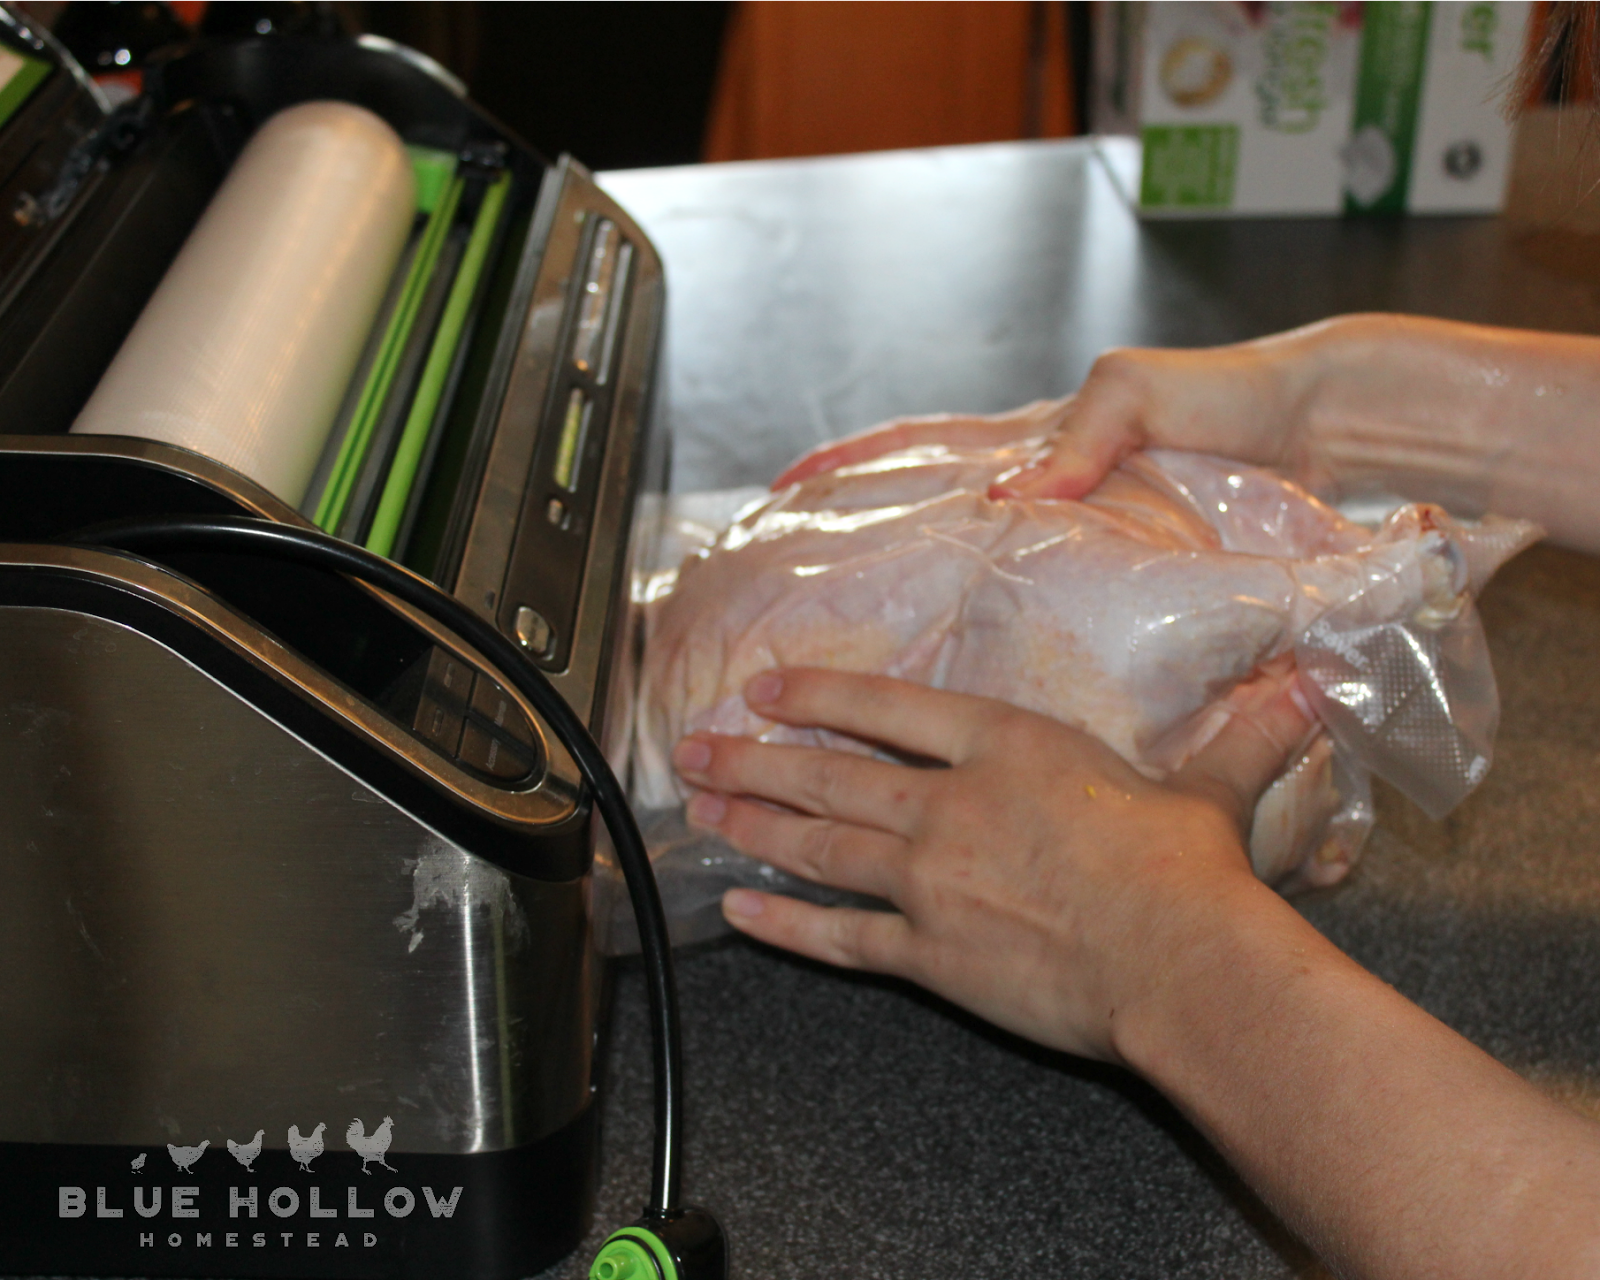
We use a food saver. This is an investment that I would highly recommend. At the very least borrow one from someone else.
Cut a bag approximately the size of the chicken- leaving a few inches on each end. It is better to err on the side of caution, in my opinion. Seal one edge.

Slide the bird into the bag with a sealed end. It is easier if you have the neck towards the sealed end. Then put the other non sealed side into the machine. It will turn green when it is working. Help push every bit of air that you can out of the bag.


Vacuum sealed poultry will last in the freezer for up to a year. Make sure to label each one with the date it was processed and weight. We are still waiting for our custom stickers to arrive. I will update the post when they do.

Cost Analysis/Final Thoughts
Expenses:
We do not include our time in our expenses, but please note that this IS an expense. Twice a day minimum care, not including the time it takes to move the tractor, for up to 8 weeks. It is a lot!
Cost of chicks: $2.33/bird = $144.46
Chicks received: 64
Chickens raised to slaughter weight: 59
15 bags of feed @ $15.99/each= $239.85
Total Expense: $384.31
Chicks received: 64
Chickens raised to slaughter weight: 59
15 bags of feed @ $15.99/each= $239.85
Total Expense: $384.31
Production:
average weight per bird: 5.1lbs
Pounds of meat produced: 305.5
Final Income/Outcome:
According to our expenses and the amount of meat we produced our all natural, local, pasture raised chicken meat cost only $1.20/lb to produce. Not only do we know exactly what went into it, know that it had a great life and swift death, AND know where it came from, but it is definitely affordable and we have more than enough food to feed our family. The amount produced does not include the organs or feet that we will be putting to use.Thanks for taking the time to read our blog post! We are so thankful that we get to raise our own chicken and know where our food comes from. We know that really the only way to know that the meat you consume was treated well is to raise it yourself. Not only has raising our own chicken meat given us food that is much healthier for our bodies, we get to see how much work goes into the food on our plate and we respect and savor every bit of the bird. Feel free to comment with any questions/comments!
Here are some links you might find useful. We are not paid or endorsed in any way.
Processing Turkey Post:
Razor Knife:
https://www.outdooredge.com/collections/razor-lite-series/products/razor-lite-edc
Where we bought our chicks:
https://www.mcmurrayhatchery.com/index.html
Lung Scraper:
https://www.strombergschickens.com/product/lung-remover/Poultry-Processing-Tools-Accessories
Plucker:
https://www.strombergschickens.com/product/table-to-drum-style-poultry-picker-with-motor/Poultry-Pluckers


Comments
Post a Comment